Alienware has been around for ages and is typically known for its gaming laptops and desktops. However, they do also make gaming peripherals like headsets, keyboards, and mice and have just released some new ones.
Estimated reading time: 13 minutes
In our Alienware AW620M review, we look at a wireless gaming mouse that reflects the company’s sleek, alien-ish design, but more importantly, offers solid gaming performance. Read on for our full review to see why it earned a Highly Rated badge here at Techaeris.
Table of contents
The Quick Take
There are plenty of wireless gaming mice to choose from these days. Ranging in price and features, it can be daunting to know which one to choose. The Alienware AW620M wireless gaming mouse ticks most of the boxes as far as features, has a comfortable, sleek design, and is pretty reasonably priced for what you get. The mouse is easily customizable with the Alienware Command Center, allowing gamers to adjust the behaviour of seven fully programmable buttons, change the DPI up to 26,000, and more. The optical switches and sensors offer solid performance, regardless of the game you play.
Most importantly for a wireless gaming mouse, there is virtually no lag that I noticed and the battery life is pretty great. With up to 140 hours with no LEDs on, I managed over 40 hours with the LEDs on medium settings. Even better, a quick 5-minute charge will get you back up and running for another 10 hours.
It’s not perfect, however, with the USB-C dongle (while nice) feeling a bit fragile, and the USB Dongle Extender is very small, meaning it can be easily misplaced. That being said, those are minor design issues and this wireless gaming mouse is still worth picking up if you’re in the market.
Specifications
The Alienware AW620M Wireless Gaming Mouse we reviewed has the following features and specifications:
| Device Type | Wireless Gaming Mouse |
| Form Factor | Right-handed |
| Connectivity | 2.4GHz wireless, USB wired |
| Polling Rate | 1000Hz |
| Battery Life | Up to 140 Hours (2.4GHz Gaming Wireless) |
| Fast Charging | 5 minutes charge for up to 10 hours of gameplay |
| Battery Technology | Polymer Li-ion Rechargeable Battery |
| Movement Resolution | Native 26,000 DPI |
| Sensor Max Speed | 650 IPS |
| Sensor Max Acceleration | 50G |
| Sensor Technology | Optical |
| Number of Buttons | 7 fully programmable |
| Click Lifespan | 70 Million for L/R Buttons |
| Lighting | 3 Zones, 16.8 Million RGB, AlienFX |
| Cable Type | 2m Light Ultra flexible Braided Cable |
| Colours | Lunar Light, Dark Side of the Moon |
| Keyplate Structure | Magnetically Assisted Independent Keyplates; Optical Switches |
| Charging Connector | 2 meter USB-A to USB-C lightweight, ultra flexible nylon braided cable |
| OS Required | Windows 10 and up, Windows 11, SteamOS |
| Software Required | Alienware Command Center for customization |
| Features | 2-meter USB-A to USB-C lightweight, ultra-flexible nylon braided cable |
| Dimensions | 3.06 x 5.18 x 1.63 inches (77.8 x 131.5 x 41.5 mm) |
| Weight | 0.22lbs (100g) |
| Service and Support | Limited 2-year |
What’s in the box
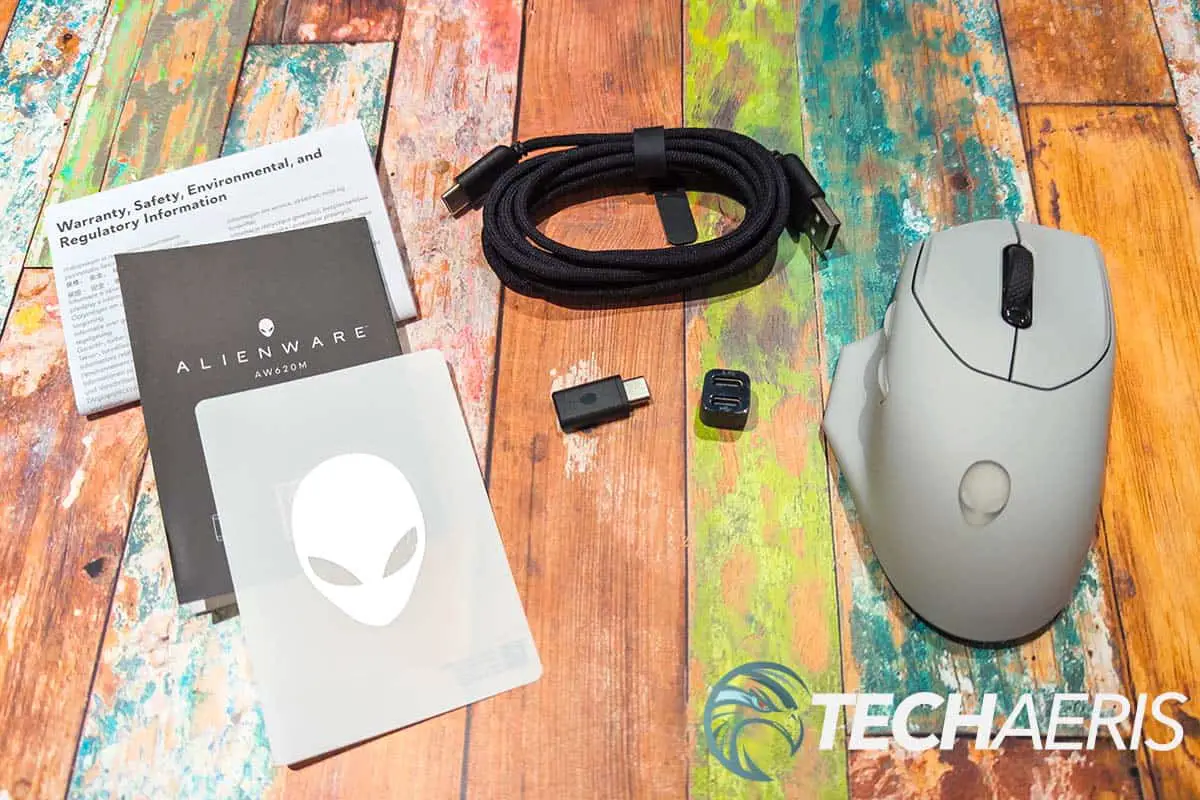
- Alienware AW620M Wireless Gaming Mouse
- 2.4GHz USB-C Dongle
- USB-C Dongle Extender
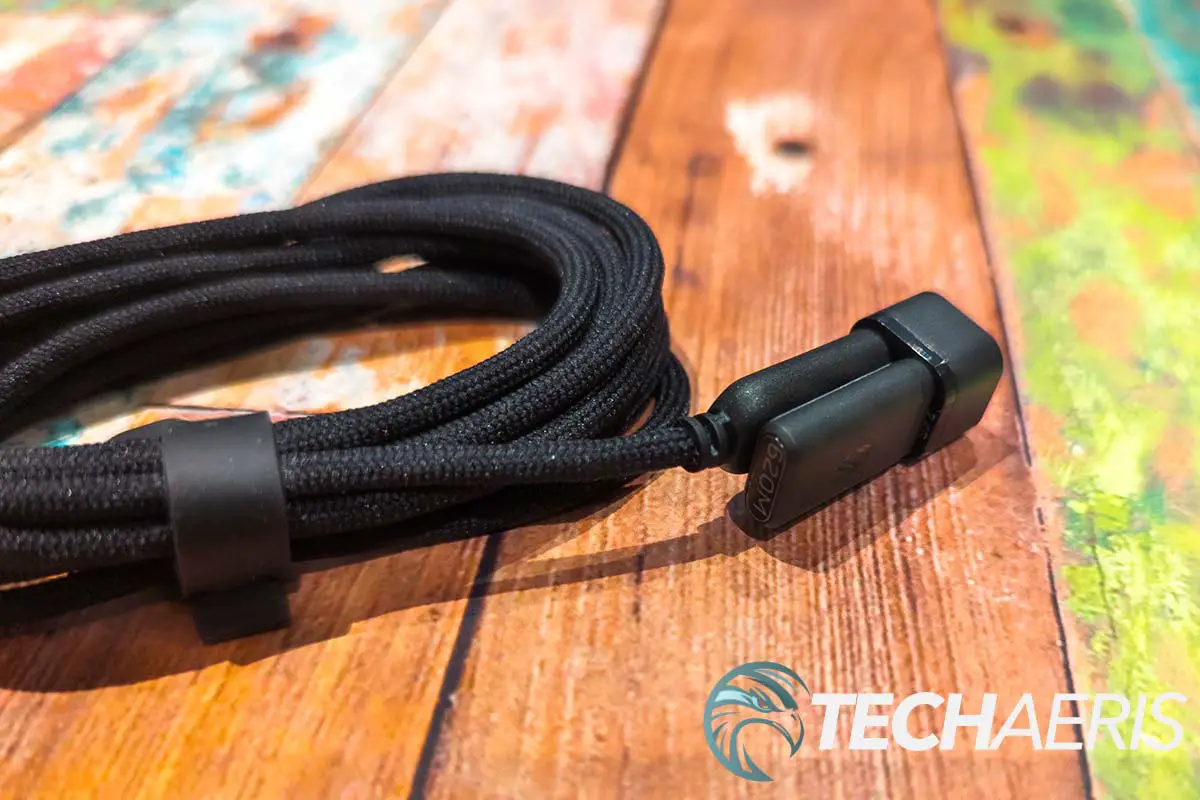
- USB-A to USB-C cable
- Quick Start Guide
- Alienware Logo Head Sticker
- Regulatory Information
Design
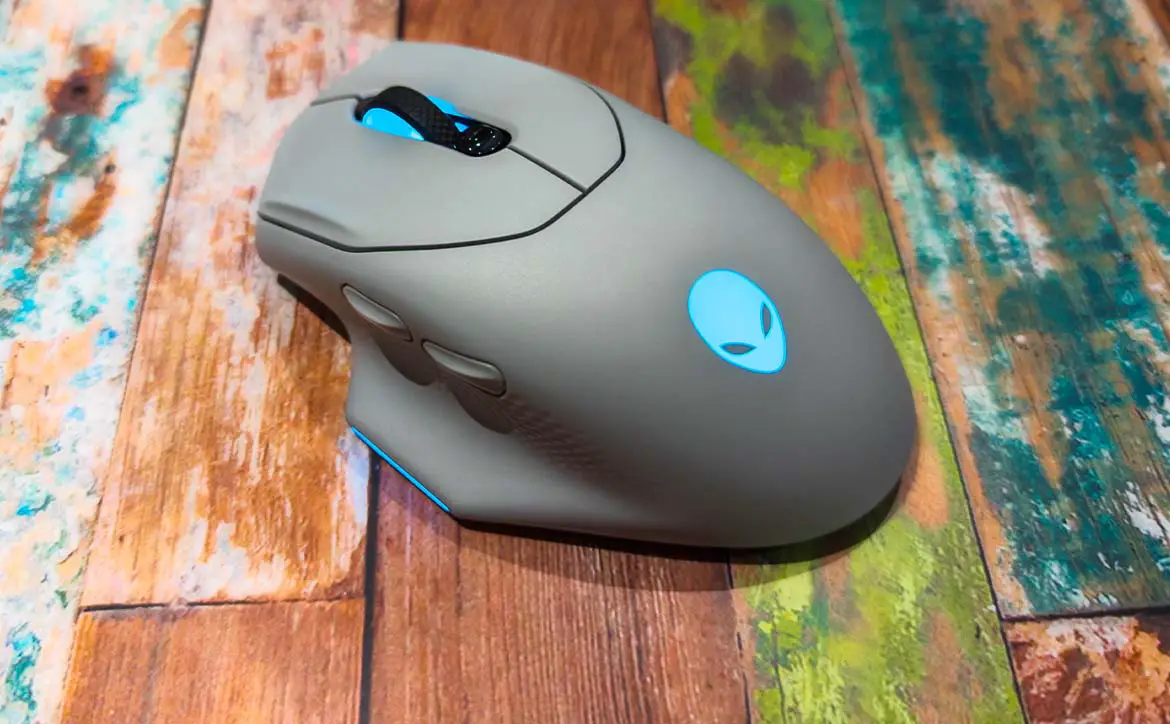
As far as wireless gaming mice go, the Alienware AW620M follows the basics but has a more fluid, sleek look to it. Our review unit was the “Lunar Light” (off-white/light gray) colour and it also comes in a darker “Dark Side of the Moon” colourway. On that note, for some reason, the Lunar Light colour just seems to accentuate the alien name in my opinion.
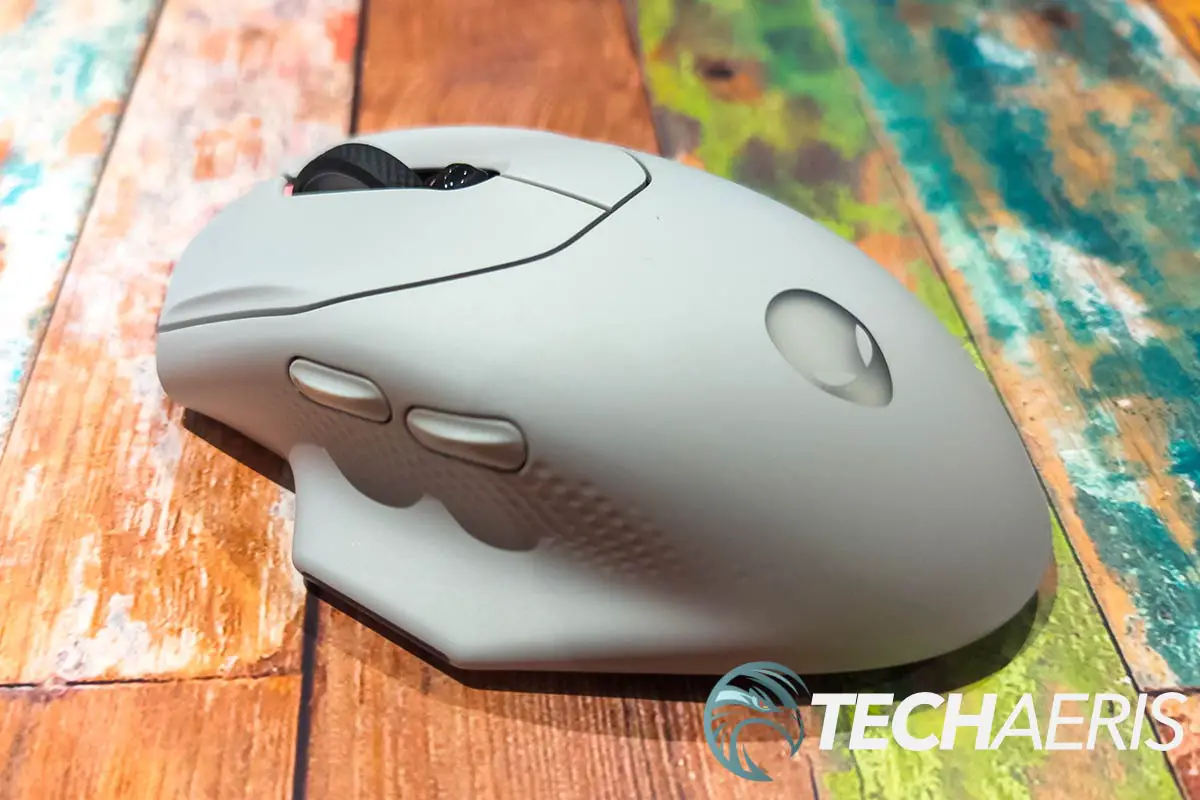
On that note, the mouse is fairly slim, about three inches wide, just over five inches in length, and just over an inch-and-a-half in height. The left and right top mouse buttons extend to about halfway down the top of the mouse. Each button is slightly grooved, and your fingers rest nicely on them as a result. Centred between them is the center mouse wheel, complete with LED lighting, and a DPI adjustment button below it. The Alienware logo is centred on the palm rest and also has LED lighting capabilities.
Whereas most mice are ovalish in shape, the AW620M wireless gaming mouse is angled towards the user at the front. In other words, the right mouse button is a bit longer than the left as it curves a bit. The right side of the mouse is slightly indented and has a reverse dimple motif for grip. The left side is fairly flat and has the same type of grip. Near the top of the side are two programmable side buttons. Below these, the left side flares out with a flange you can rest your thumb on. I’m a huge fan of this style of mouse as I find my thumb is more comfortably positioned as opposed to having to hold it up slightly or drag it across the mouse mat when in use. The very edge of the thumb rest has a third customizable LED light.
The front of the mouse has a gloss black finish, slightly recessed and curved outwards. Centred in the middle is a USB-C port for wired use and charging the mouse.
Finally, on the underside of the mouse are three pads for traction, larger ones at the back and front and a thin one underneath the thumb rest. Centred on the bottom is the optical sensor and to the right of that (when looking at the bottom) is the on/off switch. Curiously enough, even when used in wired mode the mouse has to be turned on for it to function, even if you don’t have the wireless dongle plugged into your computer. It’s not a big deal but is something of note regardless.
The USB-C dongle is a bit less robust than standard USB-A ones, especially considering how slim USB-A dongles have become. As it is thin and sticks out about 3/4″ of an inch, if you are using this mouse with a laptop, there is the slight danger of knocking it and possibly inadvertently bending it.
If you don’t have a free USB-C port on your computer, the mouse also includes a very small (1/2″ x 1/2″ x 3/8″) adapter cube. The top has two USB-C ports, one labelled 2.4GHz which is where you put the dongle. In the other port, you connect the included (roughly) 6′ braided USB-C to USB-A cable and then connect the USB-A end to your computer.
While the design of the mouse itself is great, the dongle could be a bit more substantial, as could the dongle extender.
Ease of Use
The Alienware AW620M wireless gaming mouse can be used in two ways: wired or wireless. Wired is straightforward, simply connect the USB-C end to the mouse and the USB-A end into a free port in your computer, turn the mouse on, and you’re good to go.
When using wirelessly, you have two options. You can plug the USB-C dongle directly into a USB-C port on your computer if you have one available. If you don’t, you can plug the dongle into the top port on the dongle extender and then the included cable into the bottom and then a free USB-A port on your computer. In either case, once done, turn the mouse on and you’re good to go.
Out of the box, the DPI toggle button is default mapped to 800, 1200, 1600, 2400, and 3200 DPI. You can tilt the DPI button forward or back to decrease or increase the DPI between these presets. While you don’t need it for basic functionality, you’ll want to use the Alienware Command Center software to customize the LED lighting, side buttons, and other features.
Software
Whether you want to use it or not, like the Razer Synapse software, the Alienware Command Center pretty much auto-installs as soon as you plug the Alienware AW620M into a new computer. As I feel about the Razer software, the user should be the one to initiate the installation sequence.
That being said, you’ll want it installed if you want to take advantage of the customization options of the wireless gaming mouse, as well as make adjustments for extending battery life. As for the software itself, it’s a bit of a mixed bag. Upon launching. the Home screen displays any games you have installed, allowing easy access to launch them. There are also buttons to change the overall theme (lighting/button mapping/etc) and power performance for all attached Alienware devices. Scrolling down, you will eventually get to the section that shows the mouse and what theme and power setting are currently applied to it.
The second button across the top is the Library button. Here, you’ll see all the games you have currently installed, as well as a scan and manually add button to add any that are missing. Here you can apply a specific theme and power setting to enable when you launch each specific game.
The third button, FX, is where you’ll do all your configuring for the mouse. Selecting it shows a top view of the mouse, the current battery life remaining, and what theme is currently active. There are smaller buttons for Edit, Go Dim (cuts LED brightness by about 50%), and Go Dark (disables LEDs altogether). More buttons sit below this for Lighting, Macros, and Settings. Finally, under those is a list of all your Themes.
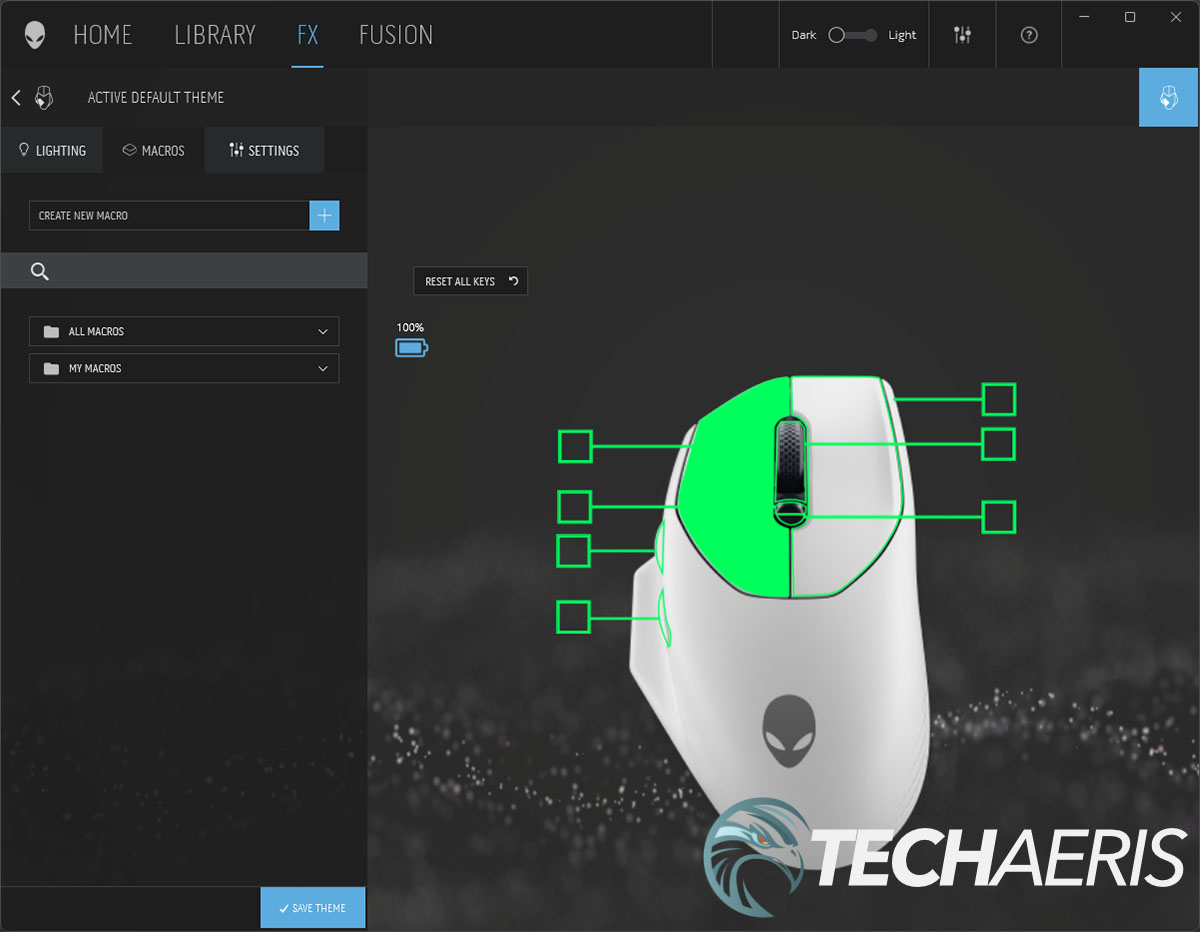
When you select the Lighting, Macros, or Settings buttons, a smaller fly-out with the mouse listed appears. You’ll have to select it to continue. Once you do, the Lighting button lets you set all zones together or the Logo Head, Strip LED, or Mouse Scroll wheel separately. Effect options include Static Default Blue, Morph, Pulse, Color, Breathing, and Spectrum.
The Macros button is where you’ll create new macros or functions and map them to the mouse. At first, it was pretty confusing until I realized that you have to DRAG your macro from the macros folder onto the button you want to remap. Most software I’ve used in the past lets you click on the button in the image of the mouse on the software and then apply it that way. At any rate, once I figured that out, it wasn’t very difficult to add custom functions to the different buttons. On that note, the DPI toggle can take two settings, one for pushing it forward and the other back.
Then there is the Settings button. When selected, there are four more options available: Settings, DPI Settings, Calibration, and Update. Unfortunately, no matter how wide you make the Alienware Command Center window, you can only ever see three of these options. The Settings button (within the parent Settings button) lets you toggle Auto Endurance Mode, Enable Lighting Power Saving, adjust Polling Rate Delay, Enhance Pointer Precision, Switch Primary and Secondary Buttons, adjust Double Click speed, and adjust Scroll speed. Once you’ve made a change here, clicking the Save Theme button at the bottom will apply your changes.
The DPI Settings button is straightforward, allowing you to set up to five custom DPI settings between 0 and 26,000. Under Calibration, you can adjust the Lift-off Distance. Finally, the Update button displays what firmware version you are using and allows you to update it if you aren’t on the current firmware version. To be honest, the Settings section needs a bit of rework, or even condensing into one instead of four sub-sections.
Finally, back to the main buttons. Along the top beside the FX button is the Fusion button. This button lets you set Power Management features, as well as adjust when to turn off the display, sleep, and toggle AlienFX lighting on or off.
While the Alienware Command Center works, it isn’t the most straightforward configuration app I’ve used.
Performance
The Alienware AW620M wireless gaming mouse features an optical sensor with 650 IPS maximum speed, 50G maximum acceleration, and up to 26,000 DPI movement resolution. As for the buttons, Alienware states that the left and right mouse buttons are rated for 70 million clicks.
All that aside, I had no problems with the performance of the mouse when gaming or when using it for productivity work. Whether I was playing Warzone 2.0 or Heroes of the Storm, when set to my preferred DPI settings, the mouse was as responsive as I’d expect it to be. Clicks registered as they should, and I didn’t feel any lag in movements or actions when used wirelessly either.
Battery Life
Alienware claims up to 140 hours of use between chargers. Of course, this comes with the caveat that you have the LED lights off, the mouse is in Auto Endurance Mode, and you have turned on the Enable Lighting Power Saving feature. That being said, I was able to achieve roughly 40 hours with the “Go Dim” setting enabled which is a full work week’s worth of use (five 8-hour work days) before requiring recharging. When used for just gaming and home computer use, the 40 hours would last me a few weeks at least.
The middle wheel will pulse yellow when battery life is low. After plugging it into charge, the LED will morph between yellow and green for 12 seconds and then revert to the lighting you have set up for the mouse. Finally, when it’s fully charged, it will blink green for 3 seconds, stay solid green for 9, then revert to the user default lighting.
I never really timed an empty to full charge as I typically do it overnight. However, I did drain it and then charge it for exactly 5 minutes. As Alienware indicates, I did get another 9 or so (not quite the 10) hours of use out of it before having to plug it in again.
Price/Value
With an MSRP of $99.99, there are cheaper — and more expensive — options and this falls somewhere in the upper-middle price range. Given the comfortable design and solid battery life when configured appropriately, the Alienware AW620M wireless gaming mouse offers up pretty solid value for the price.
Photo Gallery
Wrap-up
With great gaming performance and solid battery life, if you’re in the market for a new gaming mouse, the Alienware AW620 is a solid choice with its comfortable design. Based on the mice I’ve used over the past few years, it’s definitely higher on my recommended mice to consider list.
In some of our articles and especially in our reviews, you will find Amazon or other affiliate links. As Amazon Associates, we earn from qualifying purchases. Any other purchases you make through these links often result in a small amount being earned for the site and/or our writers. Techaeris often covers brand press releases. Doing this does not constitute an endorsement of any product or service by Techaeris. We provide the press release information for our audience to be informed and make their own decision on a purchase or not. Only our reviews are an endorsement or lack thereof. For more information, you can read our full disclaimer.
Last Updated on March 13, 2024.

